전자공학과이지만 캡스톤등 다양한 프로젝트를 하면서 어플리케이션의 필요했다.
따라서 안드로이드를 독학으로 공부하면서 다양한 책 인강등을 봐왔지만 나에게 필요없는 내용이 더욱더 많았다.
그래서 이번 포스팅으로 안드로이드에 가장기초라할수있는 레이아웃에대한 기초를 포스팅할려고한다.
※레이아웃
○ ViewGroup 클래스로부터 상속받으며 내부에 무엇을 담는 용도로 사용
○ 레이아웃 중에서 가장 많이 사용되는 것은 리니어레이아웃(LinearLayout)
※레이아웃에서 자주 사용되는 속성
○ orientation : 레이아웃 안에 배치할 위젯의 수직 또는 수평 방향을 설정
○ gravity : 레이아웃 안에 배치할 위젯의 정렬 방향을 좌측, 우측, 중앙으로 설정
○ padding : 레이아웃 안에 배치할 위젯의 여백을 설정
○ layout_weight : 레이아웃이 전체 화면에서 차지하는 공간의 가중 값을 설정 여러 개의 레이아웃이 중복될 때 주로 사용
○ baselineAligend : 레이아웃 안에 배치할 위젯들을 보기 좋게 정렬
※레이아웃의 종류

○ 리니어레이아웃 : 왼쪽 위부터 아래쪽 또는 오른쪽으로 차례로 배치
○ 렐러티브레이아웃 : 위젯 자신이 속한 레이아웃의 상하좌우의 위치를 지정하여 배치
○ 테이블레이아웃 : 위젯을 행과 열의 개수를 지정한 테이블 형태로 배열
○ 그리드레이아웃 : 테이블레이아웃과 비슷하지만, 행 또는 열을 확장하여 다양하게 배치할 때 더 편리
○ 프레임레이아웃 : 위젯들을 왼쪽 위에 일률적으로 겹쳐서 배치하여 중복해서 보이는 효과를 냄
※ orientaion 속성
○ 리니어레아웃의 가장 기본적인 속성
- Vertical : 리니어레이아웃 안에 포험될 위젯의 배치를 수직방향으로 쌓음
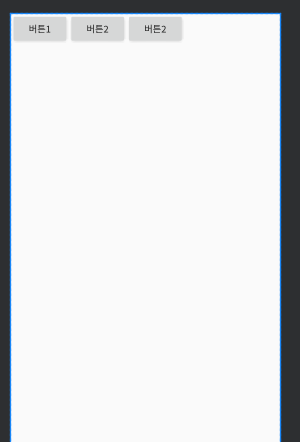
- Horizontal : 수평 방향으로 쌓겠다는 의미
<LinearLayout xmlns:android="http://schemas.android.com/apk/res/android"
    xmlns:tools="http//schemas.android.com/tools"
    android:layout_width="fill_parent"
    android:layout_height="fill_parent"
    android:orientation="vertical">
  ~~~여기에 위젯들을 배치~~~~
</LineraLayout>
-Vertical 속성 설정시 버튼이 수직으로 나란히 정렬
<?xml version="1.0" encoding="utf-8"?>
<LinearLayout xmlns:android="http://schemas.android.com/apk/res/android"
    android:orientation="vertical"
    android:layout_width="match_parent"
    android:layout_height="match_parent">

    <Button
        android:layout_width="wrap_content"
        android:layout_height="wrap_content"
        android:text="버튼1"/>
    <Button
        android:layout_width="wrap_content"
        android:layout_height="wrap_content"
        android:text="버튼2"/>
    <Button
        android:layout_width="wrap_content"
        android:layout_height="wrap_content"
        android:text="버튼2"/>
</LinearLayout>
되는 것을 확인할수가 있다.

- horizontal 로 바꾼다면 이렇게 배치된다.

- gravity 는 레이아웃안의 위젯들의 배치를 결정한다

bottom 을주어서 위젯들은 아래부터 배치하게 할수가 있다.

|
gravity 속성 |
|
|
top |
상단에 배치 |
|
bottom |
하단에 배치 |
|
left |
왼쪽에 배치 |
|
right |
오른쪽에 배치 |
|
center_vertical |
수직의 중앙에 배치 |
|
center_horizontal |
수평의 중앙에 배치 |
|
center |
수평,수직의 중앙에 배치 |
- 또한 or 연산자를 이용하여 gravitiy에 동시에 속성을 적용할수가 있다.


※ layout_gravity 속성
○ layout_gravity는 자신의 위치를 부모의 어디쯤에 위치시킬지를 결정
○ orientation이 수직속성 설정이고 layout_gravity가 각각 좌 중앙 우 로 줌으로써 배치를 다르게 할수있다.
gravitiy가 자신안의 레이아웃 배치를 결정하는 것이라면 Layout_gravity는 자신자체의 레이아웃의 배치를 결정
<?xml version="1.0" encoding="utf-8"?>
<LinearLayout xmlns:android="http://schemas.android.com/apk/res/android"
    android:orientation="vertical"
    android:layout_width="match_parent"
    android:layout_height="match_parent">

    <Button
        android:layout_width="wrap_content"
        android:layout_height="wrap_content"
        android:layout_gravity="right"
        android:text="버튼1"/>
    <Button
        android:layout_width="wrap_content"
        android:layout_height="wrap_content"
        android:layout_gravity="center_horizontal"
        android:text="버튼2"/>
    <Button
        android:layout_width="wrap_content"
        android:layout_height="wrap_content"
        android:layout_gravity="left"
        android:text="버튼2"/>
</LinearLayout>
※baselineAligned
○ baselineAligned 속성은 크기가 다른 위젯들을 보기 좋게 정렬함
○ true와 false 값을 가질 수 있음.

※ 레이아웃 배경색 지정
○ android:background="#9b7798" 를 이용하여 그 레이아웃의 색갈을 지정할수가 있다.
※중복 리니어레이아웃 형태

- 가장 바같족의 레이아웃의 orientation은 vertical(수직) 속성을 이용해 위에서부터 아래로 정렬한다.
- 정렬된 레이아웃은 각각 orientation을 다르게 설정할수가 있다.
※ 위제 크기를 위해 필수 입력 요소
○ match_parent : 위젯이 차지할 수 있는 최대의 크기
○ wrap_content : 내용이 표시될 수 있는 최소한의 공간만 사용
// 정수형 숫자 + 단위(dp,px)

이렇게 LinearLayout에 대해서 간략하게 개념부터 집고 넘어가 보았다.
하지만 LinearLayout은 xml언어상에서 순서도 중요하다. 하지만 LinerarLayout에서는 표현하기 어려운 위젯 배치가 많다.
이러한 문제를 해결하기위해서 렐러티브레이아웃을 사용한다. 렐러티브레이아웃은 위젯간의 관계에 대해서 위젯의 위치를 설정할수 있다.
또한 이러한 렐러티브레이아웃은 강력한 레이아웃 배치 마법사를 지원한다.
'개인공부' 카테고리의 다른 글
| 안드로이드 : 테이블레이아웃(계산기) (0) | 2020.07.09 |
|---|---|
| 안드로이드 : 렐러티브레이아웃 (0) | 2020.07.09 |
| 안드로이드 : SoundPool ( mp3플레이어 재생,배경음 재생) (0) | 2020.07.09 |
| 안드로이드 : java로 layout 및 버튼 구현 (0) | 2020.07.09 |
| 안드로이드 : layout중복 (0) | 2020.07.09 |


