반응형
※ 테이블레이아웃(TableLayout)
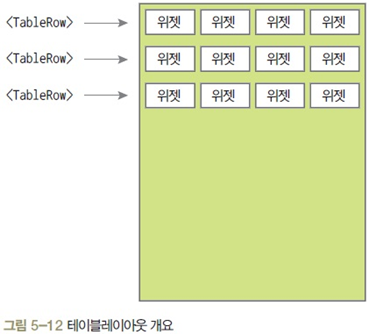
○ 주로 위젯을 표 형태로 배치할 때 사용
○ <TableRow> 와 함께 사용되는데 <TableRow>의 개수가 바로 행의 개수가 됨
○ 열의 개수는 <TableRow> 안에 포함된 위젯의 개수로 결정

※ 테이블레이아웃의 기본 XML 코드

- TableLayout안에는 Row 행 속성의 레이아웃을 다시 설정할수있다.
- 열속성은 Row속성안에서 위젯의 순서에맞게 차례대로 배치가된다.
- layout_span이라는 속성을 이용해서 현재위젯이 몇개의 열의 크기를 차지하게 할지 선택할수가 있다.
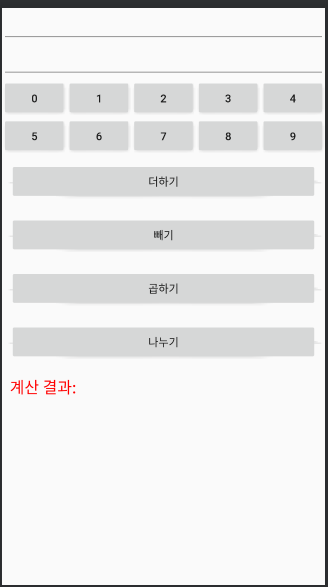
※ 테이블 레이아웃을 이용해서 계산기 배치 만들기.
<?xml version="1.0" encoding="utf-8"?>
<TableLayout xmlns:android="http://schemas.android.com/apk/res/android"
    xmlns:app="http://schemas.android.com/apk/res-auto"
    xmlns:tools="http://schemas.android.com/tools"
    android:layout_width="match_parent"
    android:layout_height="match_parent"
    android:stretchColumns="*"
    android:shrinkColumns="*"
    tools:context=".SecondActivity">
    <EditText
        android:id="@+id/edit1"></EditText>


    <EditText
        android:id="@+id/edit2"></EditText>

    <TableRow>

        <Button
            android:text="0"
            android:id="@+id/but_0"/>
        <Button
            android:text="1"
            android:id="@+id/but_1"/>
        <Button
            android:text="2"
            android:id="@+id/but_2"/>
        <Button
            android:text="3"
            android:id="@+id/but_3"/>
        <Button
            android:text="4"
            android:id="@+id/but_4"/>

    </TableRow>
    <TableRow>
        <Button
            android:text="5"
            android:id="@+id/but_5"/>
        <Button
            android:text="6"
            android:id="@+id/but_6"/>
        <Button
            android:text="7"
            android:id="@+id/but_7"/>
        <Button
            android:text="8"
            android:id="@+id/but_8"/>
        <Button
            android:text="9"
            android:id="@+id/but_9"/>

    </TableRow>
    <TableRow>
        <Button
            android:layout_margin="10dp"
            android:id="@+id/Add"
            android:text="더하기"
            android:layout_span="5"/>
    </TableRow>
    <TableRow>
        <Button
            android:layout_margin="10dp"
            android:id="@+id/Sub"
            android:text="빼기"
            android:layout_span="5"/>
    </TableRow>
    <TableRow>
        <Button
            android:layout_margin="10dp"
            android:text="곱하기"
            android:id="@+id/Mul"
            android:layout_span="5"/>
    </TableRow>
    <TableRow>
        <Button
            android:layout_margin="10dp"
            android:text="나누기"
            android:id="@+id/Div"
            android:layout_span="5"/>
    </TableRow>
    <TableRow
        android:layout_margin="10dp">
        <TextView
            android:textSize="20dp"
            android:text="계산 결과: "
            android:textColor="#FF0000"
            android:layout_span="2"/>
        <TextView
            android:id="@+id/result"
            android:textSize="20dp"
            android:textColor="#FF0000"/>
    </TableRow>
</TableLayout>
- 위 xml은 안드로이드 키보드를 이용해서 Edittext에 입력하는 방식이 아닌 버튼을 활용해서 값을 입력받는 방식이다.
- 이처럼 안드로이드는 다양한 레이아웃을 지원하고 있다. 사용자가 필요한 레이아웃을 활용하여 원하는 레이아웃을 만들수 있다.

반응형
'개인공부' 카테고리의 다른 글
| 안드로이드 : 기본 위젯 (0) | 2020.07.09 |
|---|---|
| 안드로이드 : 기본 애플리케이션 (0) | 2020.07.09 |
| 안드로이드 : 렐러티브레이아웃 (0) | 2020.07.09 |
| 안드로이드 : 레이아웃 기본개념(LinearLayout) (0) | 2020.07.09 |
| 안드로이드 : SoundPool ( mp3플레이어 재생,배경음 재생) (0) | 2020.07.09 |


