반응형
CLASS명 작성 요령 정리

<!DOCTYPE html>
<html lang="en">
<head>
    <meta charset="UTF-8">
    <meta http-equiv="X-UA-Compatible" content="IE=edge">
    <meta name="viewport" content="width=device-width, initial-scale=1.0">
    <title>class 명</title>
    <style>
        body {
            background-color: gray;
        }

        .section {
            overflow: hidden;
            width: 300px;
            margin : 0 auto;
            word-break: break-all;
            word-wrap: break-word;
            position: relative;
            padding: 38px 20px 20px;
            border-radius: 12px;
            text-align: center;
            -webkit-box-sizing: border-box;
            box-sizing: border-box;
            background-color: white;
        }

        .description {
            font-size: 14px;
            line-height: 23px;
            color: #8c8c8c;
        }

        .buttonArea {
            margin-top: 24px;
            display: flex;
            width: 100%;
            justify-content: center;
        }

        .buttonBase {
            flex: 1;
            line-height: 46px;
            height: 46px;
            border: 1px solid rgba(126, 150, 255, 0.15);
            border-radius: 12px;
            background-color: gray;
            text-decoration: none;
            color: white;
        }

        .primary {
            background-color: skyblue;
        }
    </style>
</head>
<body>
    <div class="section">
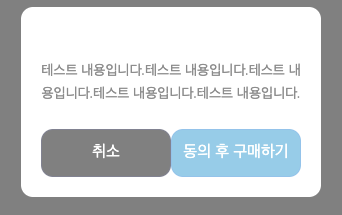
        <p class="description">
            테스트 내용입니다.테스트 내용입니다.테스트 내용입니다.테스트 내용입니다.테스트 내용입니다.
        </p>
        <div class="buttonArea">
            <a href="#" class="buttonBase">취소</a>
            <a href="#" class="buttonBase primary">동의 후 구매하기</a>
        </div>
    </div>
</body>
</html>
Modal 관련 클래스.
제목 내용 버튼 두개로 이루어진 Modal의 클래스명 작성 요령
<div class="layerModule || section">
    <div class="modalContent">
        <div class="title"></div>
        <div class="text || description"></div>
    </div>
    <div class="MultiButton || buttonArea">
        <a></a>
        <a></a>
    </div>
</div>- button같은 경우 buttonArea로 한번 감싸고 button 클래스를 정의하는게 깔끔하다.
Tab

<div class="tabLiner">
    <div class="list" role="tablist" aria-label="상담 상태 메뉴">
        <a href="#" class="item" role="tab" aria-selected="true"> </a>
    </div>
</div>- tab > list > item 순으로 클래스명을 작성.
<!DOCTYPE html>
<html lang="en">
<head>
    <meta charset="UTF-8">
    <meta http-equiv="X-UA-Compatible" content="IE=edge">
    <meta name="viewport" content="width=device-width, initial-scale=1.0">
    <title>tab</title>
    <style>
        body {
            margin: 0;
        }

        .tabList {
            position: relative;
            height: 54px;
            padding: 0 20px;
            white-space: nowrap;
            overflow-y: hidden;
            overflow-x: auto;
            background-color: #fafbff;
        }

        .list {
            display: flex;
            align-items: center;
            max-width: 100%;
            height: 100%;
        }

        a {
            color: #000;
            text-decoration: none;
        }

        .item {
            flex: 1;
            text-align: center;
            min-width: min-content;
            position: relative;
            display: inline-block;
            margin: 0 10px;
            padding: 0 2px;
            color: #4c4c4c;
            line-height: 54px;
            font-size: 16px;
        }
        .item[aria-selected=true] {
            color: #7e96ff;
            font-weight: bold;
        }
        .item[aria-selected=true] .text::before {
            position: absolute;
            right: 0;
            bottom: 0;
            left: 0;
            z-index: 1;
            content: '';
            border-bottom: 2px solid #7e96ff;
        }
    </style>
</head>
<body>
    <div class="tabList">
        <div class="list" role="tablsit" aria-label="상담 상태 메뉴">
            <a href="#" class="item" role="tab" aria-selected="true">
                <span class="text">A</span>
            </a>
            <a href="#" class="item" role="tab" aria-selected="false">
                <span class="text">B</span>
            </a>
            <a href="#" class="item" role="tab" aria-selected="false">
                <span class="text">C</span>
            </a>
            <a href="#" class="item" role="tab" aria-selected="false">
                <span class="text">D</span>
            </a>
        </div>
    </div>
</body>
</html>
반응형
'개인공부' 카테고리의 다른 글
| CSS transform 그리기 (0) | 2021.05.11 |
|---|---|
| css 커스텀 underLine , 줄바꿈 커스텀 (0) | 2021.05.10 |
| scss 자주쓰는 mixin (0) | 2021.05.04 |
| CSS 말줄임 후 더보기 버튼 (React) (0) | 2021.05.02 |
| SHA-256 (0) | 2021.04.17 |

